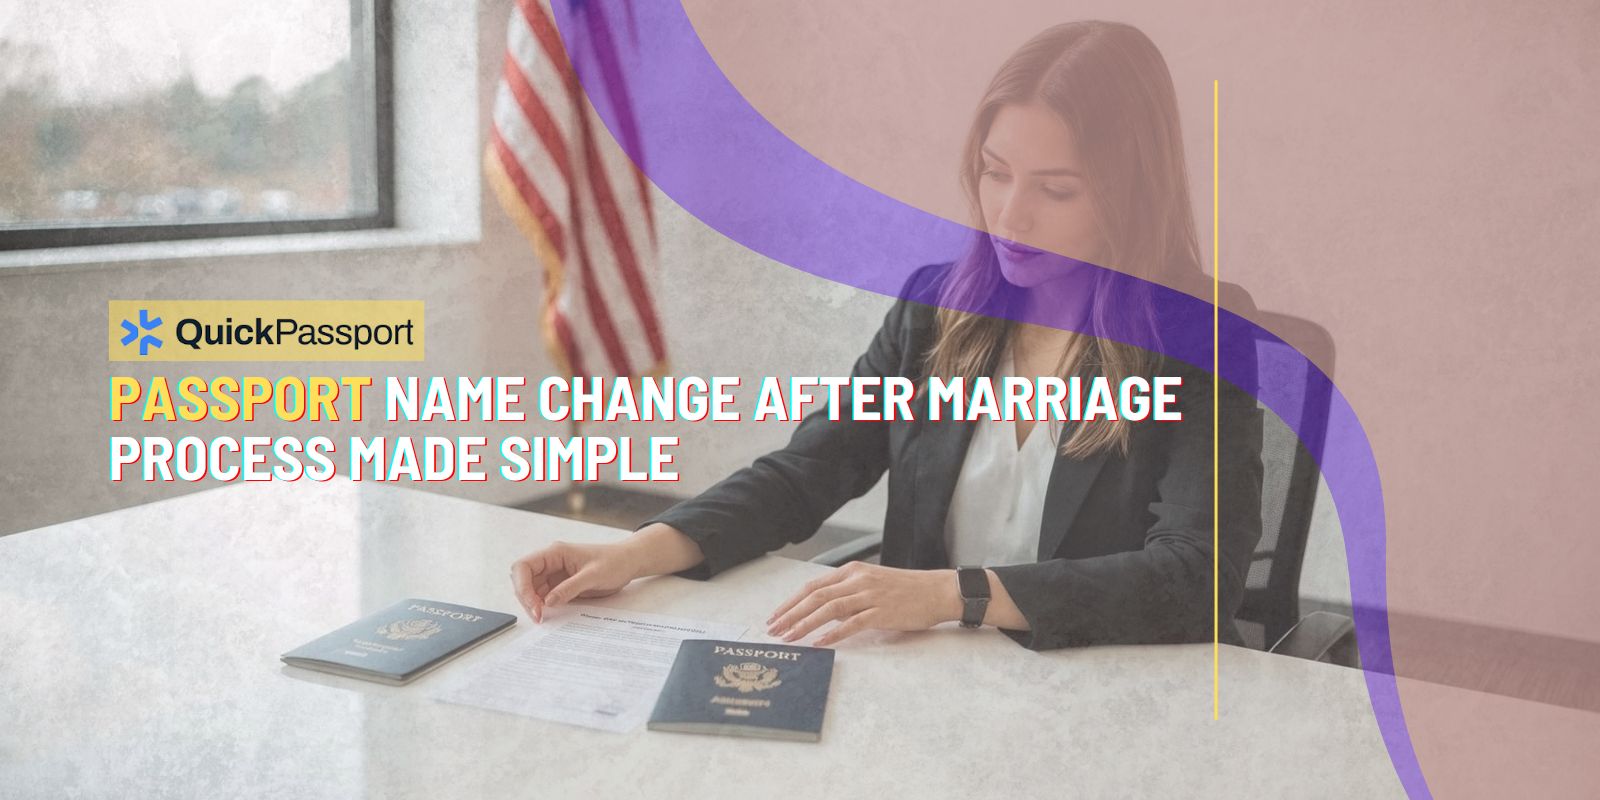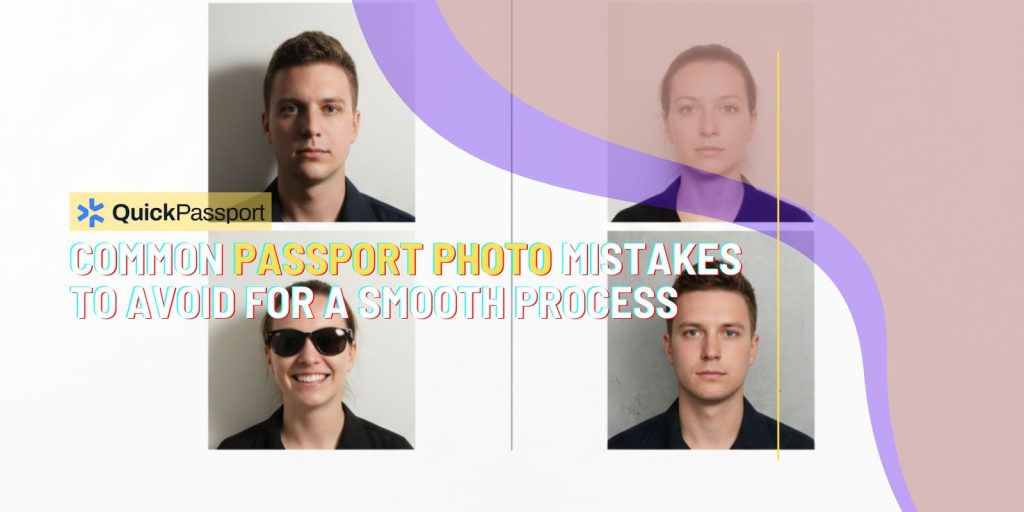
Getting your passport photo right the first time can save you significant time, money, and frustration. Every year, thousands of passport applications are delayed or rejected due to simple photo mistakes that could have been easily avoided. Whether you’re applying for your first passport or renewing an existing one, understanding the common passport photo mistakes to avoid is crucial for ensuring a smooth application process.
The passport photo serves as your official identification document for international travel, and government agencies have strict requirements that must be met. These requirements aren’t arbitrary – they’re designed to ensure clear identification and maintain security standards across all travel documents. When your photo doesn’t meet these specifications, it can result in application delays, additional fees, and the inconvenience of having to resubmit your entire application.
At QuickPassport – Arlington, we’ve seen countless applicants struggle with photo requirements that seem straightforward but contain numerous pitfalls. From lighting issues to expression problems, background concerns to sizing errors, even minor deviations from passport photo guidelines can cause major headaches. The good news is that most of these mistakes are entirely preventable with proper knowledge and preparation.
Professional passport photo services understand these requirements inside and out, but many people attempt to take their own photos or use amateur services that aren’t familiar with the specific technical requirements. This often leads to photos that look acceptable to the untrained eye but fail to meet the precise standards required by passport agencies. Understanding what can go wrong – and how to avoid these pitfalls – is essential whether you’re taking your own photo or working with a professional service.
The consequences of photo mistakes extend beyond simple inconvenience. Rejected applications mean additional processing time, extra fees for resubmission, and potential delays that could affect travel plans. In some cases, urgent travel needs might require expensive expedited processing services that could have been avoided with a correct photo from the start. Taking the time to understand and avoid common passport photo mistakes is an investment in a smooth, efficient application process.
Key Takeaways
- Background Requirements Are Non-Negotiable: Your passport photo must feature a plain white or off-white background with no shadows, patterns, or colored elements. Even subtle shadows or slight color variations can result in rejection.
- Facial Expression Must Remain Neutral: Smiling, frowning, or any exaggerated facial expressions are not permitted. Your mouth should be closed with a natural, relaxed expression that clearly shows your features.
- Eye Contact and Head Position Are Critical: You must look directly at the camera with both eyes open and clearly visible. Your head should be straight and centered, not tilted to either side.
- Lighting Must Be Even and Professional: Harsh shadows, uneven lighting, or glare can cause photo rejection. Professional, diffused lighting that evenly illuminates your face is essential for meeting requirements.
- Clothing and Accessories Have Specific Rules: Avoid uniforms, white clothing that blends with the background, large jewelry, or anything that obscures your face or neckline.
- Photo Size and Quality Standards Are Precise: Digital photos must meet exact pixel dimensions and file size requirements, while printed photos need specific measurements and high-quality printing.
- Recent Photos Are Required: Your photo must accurately represent your current appearance. Using old photos, even if they’re high quality, can lead to application rejection.
- Religious and Medical Accommodations Have Specific Procedures: If you wear religious head coverings or have medical conditions affecting your appearance, special documentation and procedures apply.
Understanding Official Passport Photo Requirements
The foundation of avoiding passport photo mistakes lies in thoroughly understanding the official requirements established by government agencies. These passport photo guidelines are detailed, specific, and strictly enforced to maintain consistency and security across all travel documents. The requirements cover every aspect of your photo, from technical specifications to personal appearance standards.
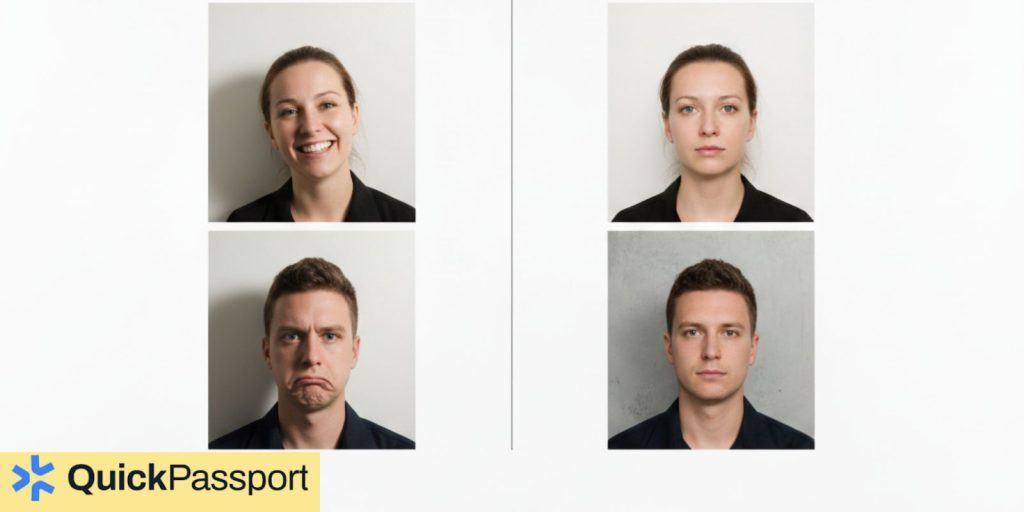
Photo dimensions represent one of the most critical technical requirements. For U.S. passports, photos must measure exactly 2 inches by 2 inches (51mm x 51mm), with your head measuring between 1 inch and 1 3/8 inches (25mm to 35mm) from the bottom of your chin to the top of your head. Digital photos must be at least 600 x 600 pixels, with a maximum file size of 240KB. These measurements aren’t suggestions – they’re mandatory specifications that automated systems check during processing.
The background requirements are equally strict and represent one of the most common sources of photo rejection. The background must be plain white or off-white, completely free of shadows, patterns, textures, or any other visual elements. This includes subtle shadows cast by improper lighting, slight color variations in the background material, or any objects visible behind you. Even professional-looking backgrounds that aren’t pure white can cause rejection.
Your positioning within the frame follows specific guidelines designed to ensure clear identification. You must face the camera directly with your full face visible and centered in the frame. Your head should be straight, not tilted to either side, and positioned so that your eyes are between 1 1/8 inches and 1 3/8 inches from the bottom of the photo. This precise positioning ensures consistency across all passport photos and enables accurate identification.
Quality standards extend beyond basic clarity to include specific technical requirements for resolution, color accuracy, and printing quality. Photos must be sharp and in focus, with natural color representation and no digital alterations or enhancements. The image quality must be sufficient to clearly show facial features, skin tone, and eye color without pixelation, blurriness, or distortion.
Critical Facial Expression and Positioning Errors
Facial expression mistakes represent some of the most frequently encountered issues in passport photo submissions, often because people underestimate how strict these requirements actually are. The requirement for a neutral expression isn’t simply a preference – it’s a security measure designed to ensure accurate facial recognition and consistent identification across different contexts and time periods.
The most common expression error is smiling, which many people do naturally when being photographed. However, passport photos require a completely neutral expression with your mouth closed and no visible teeth. Even slight smiles or subtle expressions that seem natural and pleasant can result in photo rejection. Your facial muscles should be relaxed, creating a natural, unforced appearance that accurately represents your default facial structure.
Eye-related positioning errors frequently cause photo rejection and can be particularly frustrating because they often seem minor to applicants. Both eyes must be open and clearly visible, looking directly at the camera. Common mistakes include looking slightly to one side, having one eye partially closed, or allowing hair to obscure part of an eye. If you wear glasses, additional complications can arise from glare, shadows cast by frames, or thick lenses that distort the appearance of your eyes.
Head positioning errors often result from attempting to find a flattering angle rather than adhering to the strict requirements. Your head must be completely straight and centered, not tilted to either side, forward, or backward. Many people naturally tilt their heads slightly when being photographed, but even minor tilting can cause rejection. The goal is to present your face in a completely neutral, straight-on position that provides the clearest possible view of your facial features.
Hair positioning can create unexpected problems, particularly for people with longer hair or distinctive hairstyles. Your hair cannot obscure your face, forehead, eyebrows, or ears. While you don’t need to drastically change your hairstyle, you may need to pull hair back or adjust your usual styling to ensure all required facial features are clearly visible. Hair accessories like headbands, clips, or decorative elements should be avoided unless they’re necessary to keep hair away from your face.
The distance from the camera affects how your facial features appear in the final photo and must be carefully controlled to meet size requirements. Being too close can cause distortion and make your head too large for the frame requirements, while being too far away can make facial features difficult to distinguish and fail to meet the minimum head size requirements. Professional services use specific distances and focal lengths to ensure optimal results, but DIY attempts often struggle with this critical measurement.
Background and Lighting Problems That Cause Rejection
Background and lighting issues represent technical aspects of passport photography that frequently trip up both amateur photographers and applicants attempting DIY photos. These elements might seem secondary to facial appearance, but they’re actually among the most common reasons for photo rejection because they’re governed by strict technical standards that allow no flexibility or interpretation.
Background color variations, even subtle ones, can cause immediate rejection. What appears to be “white” to the human eye often contains slight color casts, shadows, or variations that become apparent when photos are processed through official systems. Cream, ivory, light gray, or any tinted backgrounds are unacceptable, regardless of how close they appear to white. The background must be pure white or off-white with absolutely no patterns, textures, or visual elements of any kind.
Shadow problems represent one of the most technically challenging aspects of passport photography. Shadows can appear behind your head on the background, under your chin, around your neck, or cast by clothing or hair. Even subtle shadows that seem barely noticeable can cause rejection because they create visual inconsistencies that interfere with automated processing systems. Achieving truly shadow-free lighting requires specific equipment and techniques that go beyond simply taking a photo in a bright room.
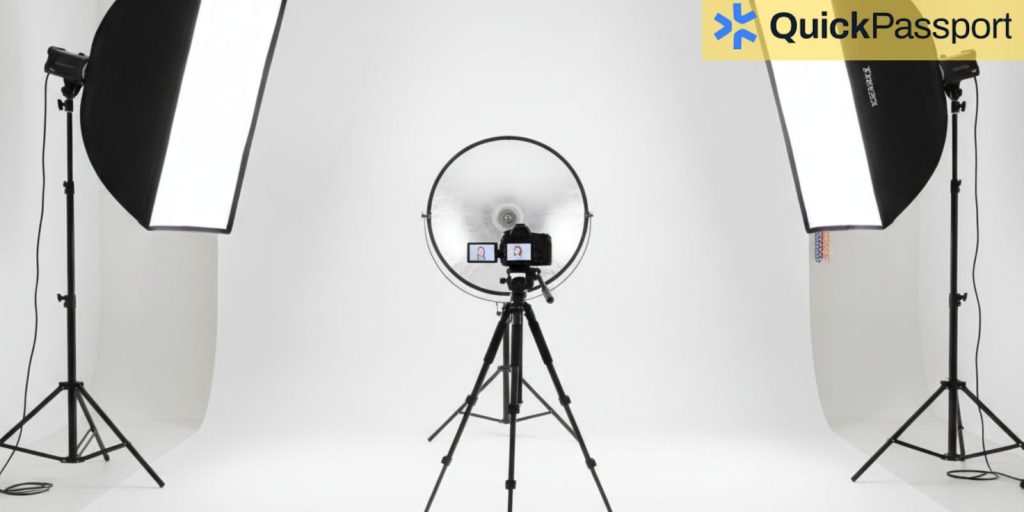
Lighting quality affects every aspect of your photo’s acceptability, from color accuracy to facial clarity. Harsh lighting creates unflattering shadows and can wash out facial features, while insufficient lighting results in photos that are too dark or lack the contrast needed for clear identification. Fluorescent lighting can create color casts that affect skin tone accuracy, while direct sunlight causes harsh shadows and potential overexposure. Professional passport photography requires carefully controlled, diffused lighting that evenly illuminates your face without creating any shadows or harsh contrasts.
Flash photography presents particular challenges for passport photos, especially when using consumer cameras or smartphones. Direct flash often creates harsh lighting, red-eye effects, or reflective glare that can obscure facial features. However, insufficient lighting without flash can result in photos that are too dark or require digital enhancement, which is not permitted for passport photos. Professional services use specialized lighting equipment that provides even illumination without the problems associated with direct flash.
Color accuracy becomes crucial when lighting isn’t properly controlled. Artificial lighting can create color casts that affect skin tone representation, while mixed lighting sources can create uneven coloration across your face. These color issues might not be immediately apparent when viewing the photo on a screen, but they become problematic when the photo is printed or processed through official systems that require accurate color representation.
Indoor versus outdoor lighting each present distinct challenges for passport photography. Indoor lighting often lacks sufficient intensity and can create color temperature issues, while outdoor lighting can be too harsh and create unwanted shadows. Even outdoor shade, which might seem ideal, can create color casts from reflected light or insufficient illumination for proper exposure. Professional passport photography services have controlled lighting environments specifically designed to meet these technical requirements consistently.
Clothing and Accessory Mistakes to Avoid
Clothing and accessory choices can significantly impact your passport photo’s acceptability, and many applicants are surprised by how specific these requirements are. The goal is to ensure that your clothing doesn’t interfere with identification while maintaining a professional appearance that will remain appropriate throughout your passport’s validity period.
Color selection plays a crucial role in passport photo success, with certain colors creating problems that aren’t immediately obvious. White or very light-colored clothing should be avoided because it can blend with the required white background, creating an unclear boundary between your body and the background. This blending effect can cause processing problems and may result in photo rejection. Dark colors generally work better, but extremely dark clothing can create too much contrast and affect the overall photo balance.
Uniform restrictions apply to various types of professional and organizational clothing. Military uniforms, police uniforms, airline pilot uniforms, and other official attire are generally prohibited in passport photos unless you’re traveling on official duty with specific authorization. This restriction extends to clothing that resembles uniforms, such as camouflage patterns or clothing with official-looking insignia. The goal is to present yourself as a civilian traveler rather than in any official capacity.
Jewelry and accessories must be carefully considered to avoid creating identification problems or visual distractions. Large earrings, prominent necklaces, or flashy jewelry can draw attention away from your facial features and may create reflective glare that affects photo quality. Small, conservative jewelry is generally acceptable, but anything that significantly alters your appearance or creates visual distractions should be avoided. Wedding rings and small earrings typically don’t cause problems, but statement pieces should be removed.
Eyewear presents particular challenges because prescription glasses are permitted but subject to specific restrictions. Your eyes must be clearly visible through the lenses without glare, reflections, or shadows cast by the frames. Thick lenses that distort the appearance of your eyes or colored lenses that change your eye color are problematic. Sunglasses and tinted lenses are strictly prohibited unless required for medical reasons with proper documentation. If you normally wear glasses, it’s generally recommended to wear them in your passport photo for identification consistency.
Head coverings and religious attire require special consideration and documentation. While religious head coverings are permitted, you must submit a signed statement explaining that the head covering is worn daily for religious purposes. The covering cannot obscure your facial features, and your face must be fully visible from the bottom of your chin to the top of your forehead and from side to side. Fashion head coverings, hats worn for style, or seasonal items like winter hats are not permitted.
Makeup considerations often surprise applicants who don’t realize that their usual makeup routine might create passport photo problems. While natural makeup is generally acceptable, dramatic makeup that significantly alters your appearance can cause identification issues. Heavy contouring, dramatic eye makeup, or bold lip colors that change your natural features should be avoided. The goal is to look like yourself in a natural, professional manner that will facilitate identification throughout your passport’s validity period.
Technical Photo Quality and Size Requirements
Technical specifications for passport photos are precisely defined and non-negotiable, representing some of the most common sources of photo rejection for applicants who attempt to handle their own photography. These requirements encompass everything from file formats and compression levels to print quality and paper specifications, all designed to ensure consistent quality across all passport applications.
Digital file specifications require exact compliance with size, resolution, and format requirements. Digital photos must be in JPEG format with a minimum resolution of 600 x 600 pixels and a maximum file size of 240KB. The photo must be square in format, not rectangular, which differs from many standard camera settings. Color photos must be in full color (24 bits per pixel), and the file cannot be compressed to a level that introduces artifacts or reduces quality below acceptable standards.
Print quality standards are equally strict for physical photos submitted with passport applications. Photos must be printed on high-quality photo paper with a matte or glossy finish, not on regular paper or using home inkjet printers that may not provide sufficient quality or color accuracy. The print must be sharp and clear with accurate color reproduction and no visible pixelation, banding, or printing artifacts that could interfere with identification.
Size accuracy extends beyond the overall 2×2 inch requirement to include specific measurements for head size and positioning within the frame. Your head must measure between 1 inch and 1 3/8 inches from chin to crown, and your eyes should be positioned between 1 1/8 and 1 3/8 inches from the bottom of the photo. These measurements are checked both manually and through automated systems, so precision is essential.
Photo age requirements specify that your photo must be taken within six months of your application date and must accurately represent your current appearance. Using older photos, even high-quality ones that meet all other requirements, can result in application rejection. Significant changes in appearance, weight, hairstyle, or facial hair since the photo was taken can create identification problems and necessitate a new photo.
Digital enhancement and editing restrictions prohibit any alterations to the photo beyond basic adjustments for brightness and contrast. Red-eye removal, blemish removal, digital makeup, or any other enhancements that alter your natural appearance are strictly forbidden. This includes filters, beauty modes, or automatic enhancements that many smartphones and cameras apply by default. The photo must represent your natural, unaltered appearance.
Submission format requirements differ depending on whether you’re applying online or submitting a paper application. Online applications require digital files that meet specific upload requirements, while paper applications need physical prints that meet printing and paper quality standards. Understanding which format you need and ensuring your photo meets the appropriate specifications is crucial for avoiding processing delays.
How QuickPassport – Arlington Ensures Photo Compliance
Professional passport photo services like QuickPassport – Arlington have developed comprehensive systems and expertise to eliminate the common mistakes that plague amateur passport photography attempts. Their specialized knowledge and professional equipment ensure that every photo meets exact government requirements while providing the convenience and confidence that comes with professional service.
QuickPassport – Arlington utilizes professional-grade photography equipment specifically calibrated for passport photo requirements. Their lighting systems provide perfectly even illumination that eliminates shadows while ensuring accurate color representation. The controlled studio environment maintains consistent conditions that guarantee optimal results regardless of weather, time of day, or other external factors that can affect amateur photography attempts.
Their staff training encompasses detailed knowledge of current passport photo guidelines, including recent changes and updates that applicants might not be aware of. This expertise extends beyond basic requirements to include understanding of common rejection reasons, special circumstances, and proper procedures for applicants with unique needs such as religious accommodations or medical conditions that affect appearance.
Quality control procedures at QuickPassport – Arlington include multiple checkpoints to verify that every photo meets all technical and appearance requirements before the customer leaves. This includes verification of background quality, lighting consistency, facial expression compliance, positioning accuracy, and technical specifications for both digital and print formats. Their systematic approach eliminates the guesswork and uncertainty that often accompanies DIY passport photos.
The convenience factor provided by QuickPassport – Arlington extends beyond simply taking the photo to include guidance on preparation, clothing selection, and positioning. Their experience with thousands of passport photos enables them to quickly identify and correct potential problems before they affect the final result. This proactive approach saves customers time and eliminates the frustration of discovering problems after submission.
Customer service at QuickPassport – Arlington includes education about the passport application process and requirements beyond just the photo. Their comprehensive understanding of passport procedures enables them to provide valuable guidance that helps ensure overall application success. This holistic approach recognizes that the photo is just one component of a successful passport application, and their expertise helps customers navigate the entire process more effectively.
Frequently Asked Questions
Can I wear makeup in my passport photo?
Yes, you can wear makeup in your passport photo, but it should be natural and not dramatically alter your appearance. Avoid heavy contouring, bold colors, or makeup techniques that significantly change your facial features, as these can cause identification problems.
What happens if my passport photo is rejected?
If your photo is rejected, you’ll need to submit a new photo that meets all requirements, which may delay processing and require additional fees. This is why working with a professional service like QuickPassport – Arlington can save time and money by ensuring compliance from the start.
Can I smile slightly in my passport photo?
No, passport photos require a completely neutral expression with no smiling. Your mouth should be closed and your facial expression should be natural and relaxed, but without any hint of a smile or other expression.
Are glasses allowed in passport photos?
Prescription glasses are generally allowed, but your eyes must be clearly visible without glare or shadows. The frames cannot be too thick or cover your eyes, and tinted or colored lenses are not permitted unless medically necessary with proper documentation.
How recent does my passport photo need to be?
Your passport photo must be taken within six months of your application date and must accurately represent your current appearance. Using older photos, even if they meet other requirements, can result in application rejection.
Can I take my own passport photo with a smartphone?
While technically possible, smartphone photos often fail to meet the strict technical requirements for lighting, background, and image quality. Professional services have specialized equipment and expertise that significantly increase the likelihood of acceptance.
What should I do if I wear religious head coverings?
Religious head coverings are permitted, but you must submit a signed statement explaining that the covering is worn daily for religious purposes. Your face must still be fully visible from chin to forehead and side to side.
Why is the background so important in passport photos?
The background must be pure white or off-white to ensure consistent processing and identification. Any shadows, patterns, or color variations can interfere with automated processing systems and result in photo rejection, which is why professional lighting and backgrounds are so important.
Conclusion
Understanding and avoiding common passport photo mistakes is essential for ensuring a smooth application process and avoiding costly delays. The requirements may seem detailed and strict, but they serve important purposes in maintaining security and enabling accurate identification throughout your passport’s validity period. From technical specifications like size and resolution to appearance requirements like facial expression and clothing choices, every aspect of your passport photo is carefully regulated.
The consequences of photo mistakes extend far beyond simple inconvenience, potentially affecting travel plans and requiring additional time and money to correct. Professional services like QuickPassport – Arlington provide the expertise, equipment, and quality control necessary to ensure compliance with all requirements while eliminating the guesswork and uncertainty that often accompanies amateur photography attempts.
Taking the time to understand passport photo guidelines and working with experienced professionals represents a smart investment in your travel documentation process. The peace of mind that comes from knowing your photo meets all requirements, combined with the convenience and expertise provided by professional services, makes the choice clear for most applicants. Whether you’re applying for your first passport or renewing an existing one, proper preparation and professional guidance can make the difference between a smooth process and a frustrating experience filled with delays and complications.